![]()
OBDII Installation of GPS Tracking Units
From locating your diagnostic port to plugging in your device, OBDII GPS tracking unit installation is a quick and easy process taking less than a minute!
OBDII Installation Process
These tracking units use a trapezoidal shaped connection which plugs directly into the on board diagnostics (OBDII) port of your vehicle. This port is available in all light duty vehicles 1997+. Since one end is larger than the other, installation can only be completed one way to ensure a proper connection.
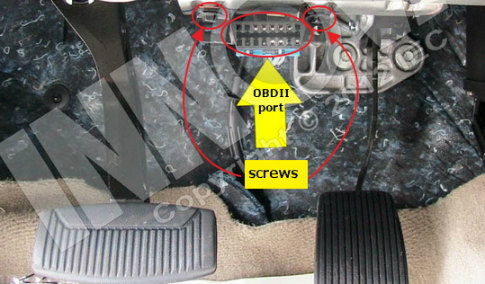
The OBDII port is typically located under the dash on the driver’s side and may be behind an easily removable panel, but it is required to be within 2 feet of the steering wheel.
Once you locate the OBDII port, simply match up the device orientation and plug it in, ensuring that it is fully and securely attached. We recommend using zip-ties to prevent devices from becoming loose.
And that’s it! Now your device’s OBDII installation is complete and can now begin tracking.
Repositioning the OBDII Port
Depending on your OBDII port location, you may feel that the unit sticks out too much. This is a simple fix with a small adjustment that will help prevent accidental (or intentional) kicking of the unit.
Every OBDII port is connected using either two screws, one screw, or no screws at all (it pops in/out). Unscrew the OBDII port, turn it 90°, and tie it back into the vehicle with a simple twist tie.
Please don’t hesitate to contact us if you have additional questions.
Check Pricing
All of our GPS tracking solutions are customized for your business and tailored to your budget...
Return on Investment
At GPS Tracking Canada, we understand that every company benefits from GPS Tracking in different ways...
Request a Demo
Get a live one-on-one demonstration from GPS Tracking Canada. See for yourself how customized...
For more information, or to schedule a demo or an installation,
call us toll free at 1.877.477.0987